实现基于HomeKit的空调控制
https://github.com/dingyiyi0226/homekit-air-conditioner https://github.com/LouisLee985/Homekit_ESP_AC_IRemote
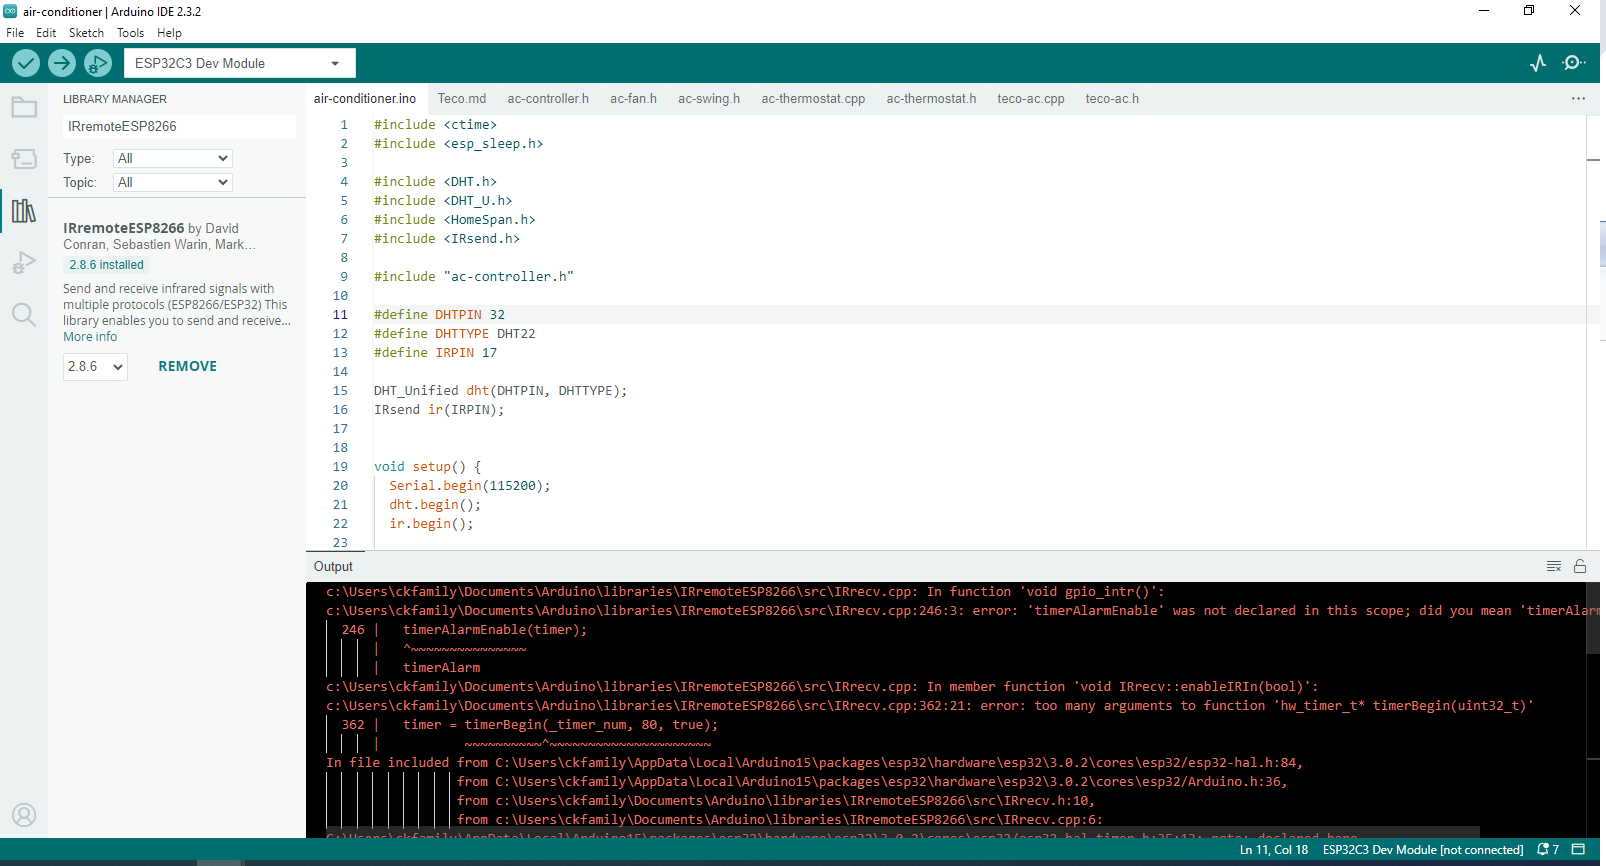
报错
 |
|---|
| 报错 |
HomeSpan逼着把ESP32库升级,升级之后采用的是IDF-5,而IRremoteESP8266并未兼容IDF-5。
再次尝试把空调做出来,身边空调的遥控器背面型号为YAP0F,因为是型号是格力,很自然会打开一个Gree的例子来控制,结果控制无效。这次先使用PulseViewer来抓包,再结合格力空调 YAPOF3 红外编码以及格力空调红外编码解析,就决定改用Kelvinator的开空调Demo来测试,果然直接可以打开空调。
/* Copyright 2016, 2018 David Conran
*
* An IR LED circuit *MUST* be connected to the ESP8266 on a pin
* as specified by kIrLed below.
*
* TL;DR: The IR LED needs to be driven by a transistor for a good result.
*
* Suggested circuit:
*     https://github.com/crankyoldgit/IRremoteESP8266/wiki#ir-sending
*
* Common mistakes & tips:
*   * Don't just connect the IR LED directly to the pin, it won't
*     have enough current to drive the IR LED effectively.
*   * Make sure you have the IR LED polarity correct.
*     See: https://learn.sparkfun.com/tutorials/polarity/diode-and-led-polarity
*   * Typical digital camera/phones can be used to see if the IR LED is flashed.
*     Replace the IR LED with a normal LED if you don't have a digital camera
*     when debugging.
*   * Avoid using the following pins unless you really know what you are doing:
*     * Pin 0/D3: Can interfere with the boot/program mode & support circuits.
*     * Pin 1/TX/TXD0: Any serial transmissions from the ESP8266 will interfere.
*     * Pin 3/RX/RXD0: Any serial transmissions to the ESP8266 will interfere.
*   * ESP-01 modules are tricky. We suggest you use a module with more GPIOs
*     for your first time. e.g. ESP-12 etc.
*/
#include <Arduino.h>
#include <IRremoteESP8266.h>
#include <IRsend.h>
#include <ir_Kelvinator.h>

const uint16_t kIrLed = 1;  // ESP8266 GPIO pin to use. Recommended: 4 (D2).
IRKelvinatorAC ac(kIrLed);  // Set the GPIO to be used for sending messages.

void printState() {
  // Display the settings.
  Serial.println("Kelvinator A/C remote is in the following state:");
  Serial.printf("  %s\n", ac.toString().c_str());
  // Display the encoded IR sequence.
  unsigned char* ir_code = ac.getRaw();
  Serial.print("IR Code: 0x");
  for (uint8_t i = 0; i < kKelvinatorStateLength; i++)
    Serial.printf("%02X", ir_code[i]);
  Serial.println();
}

void setup() {
  ac.begin();
  Serial.begin(115200);
  delay(200);

  // Set up what we want to send. See ir_Kelvinator.cpp for all the options.
  // Most things default to off.
  Serial.println("Default state of the remote.");
  printState();
  Serial.println("Setting desired state for A/C.");
  ac.on();
  ac.setFan(1);
  ac.setMode(kKelvinatorCool);
  ac.setTemp(26);
  ac.setSwingVertical(false, kKelvinatorSwingVOff);
  ac.setSwingHorizontal(true);
  ac.setXFan(true);
  ac.setIonFilter(false);
  ac.setLight(true);
}

void loop() {
  // Now send the IR signal.
#if SEND_KELVINATOR
  Serial.println("Sending IR command to A/C ...");
  ac.send();
#endif  // SEND_KELVINATOR
  printState();
  delay(5000);
}
那就可以把其和HomeSpan柔和在一起做出第一个空调控制器。
自发自收
想要实现解析,第一步先搞一个自发自收,因为涉及到的软硬件越少越好,结果大意的浪费了一天的时间,我是这样尝试的,我把发送和接收的GPIO接到了一起,就要看看能否识别一个正常发送的信号,怎么解析都不行,最后看到发送的协议数据那么少,收到的字节却那么多,开始觉得这其中必须有问题,我打印的发送是 调制 之前的,而接收是本来是解调之后的,但是却收到了解调之前的,最终定位到要想像串口、433那样可以短接管脚方式来测试,就得把发送的调制去掉,所以以下例子中的IRKelvinatorAC ac(kIrLedPin, false, false);特别关键。当然_IR_ENABLE_DEFAULT_ true应该也是非常关键的,我还没有做进一步反验证。
#define _IR_ENABLE_DEFAULT_ true

#include <IRremoteESP8266.h>
#include <IRsend.h>
#include <IRrecv.h>
#include <IRac.h>
#include <IRutils.h>

// uni homekit board
#define STATUS_PIN  7
#define CONTROL_PIN 9
#define POWER_PIN   10
#define OUT_DN      1
#define OUT_DP      0

const uint16_t kIrLedPin = OUT_DN;     // 红外发射引脚 (D2)
const uint16_t kIrRecvPin = OUT_DP;   // 红外接收引脚 (D5)
const uint8_t  kButtonPin = CONTROL_PIN;    // 按钮引脚 (D3 / GPIO0)

IRKelvinatorAC ac(kIrLedPin, false, false);
IRrecv irrecv(kIrRecvPin, 1024, 50, true);  // buffer大小为1024,超时50ms
decode_results results;

bool lastButtonState = HIGH;

void setup() {
  Serial.begin(115200);
  delay(200);

  // 设置按钮输入
  pinMode(kButtonPin, INPUT_PULLUP);

  // Enalbe Power
  // pinMode(POWER_PIN, OUTPUT);
  // digitalWrite(POWER_PIN, HIGH);


  // 初始化红外发射
  ac.begin();
  ac.setPower(true);
  ac.setTemp(24);
  // ac.setFan(kKelvinatorFanAuto);
  ac.setMode(kKelvinatorCool);

  // 初始化接收
  irrecv.enableIRIn();

  Serial.println("按下按钮发送 Kelvinator 指令并接收");
}

void printState() {
  // Display the settings.
  Serial.println("Kelvinator A/C remote is in the following state:");
  Serial.printf("  %s\n", ac.toString().c_str());
  // Display the encoded IR sequence.
  unsigned char* ir_code = ac.getRaw();
  Serial.print("IR Code: 0x");
  for (uint8_t i = 0; i < kKelvinatorStateLength; i++)
    Serial.printf("%02X", ir_code[i]);
  Serial.println();
}

void loop() {
  //Serial.println("loop\n");
  // 读取按钮状态(下降沿检测)
  bool buttonState = digitalRead(kButtonPin);
  if (lastButtonState == HIGH && buttonState == LOW) {
    Serial.println("\n按钮按下,发送 Kelvinator 指令...");
    printState();
    ac.send();

    delay(200);  // 等待信号传播完成(视硬件而定)

    // 启动接收
    Serial.println("开始接收...");
    unsigned long start = millis();
    while (millis() - start < 2000) {  // 最多等待2秒
      if (irrecv.decode(&results)) {
        Serial.println(results.decode_type);
        Serial.println("接收到 IR 信号:");
        Serial.println(resultToHumanReadableBasic(&results));
        Serial.println(resultToSourceCode(&results));
        irrecv.resume();  // 准备接收下一个
        break;
      }
    }

    Serial.println("接收结束。\n");
  }

  lastButtonState = buttonState;
}
日志
按下按钮发送 Kelvinator 指令并接收

按钮按下,发送 Kelvinator 指令...
Kelvinator A/C remote is in the following state:
  Power: On, Mode: 1 (Cool), Temp: 24C, Fan: 0 (Auto), Turbo: Off, Quiet: Off, XFan: Off, Ion: Off, Light: Off, Swing(H): Off, Swing(V): 0 (Off)
IR Code: 0x09080050000000B009080070000000B0
开始接收...
Attempting Kelvinator decode
18
接收到 IR 信号:
Protocol  : KELVINATOR
Code      : 0x09080050000000B009080070000000B0 (128 Bits)

uint16_t rawData[279] = {9028, 4520,  686, 1538,  686, 518,  686, 518,  686, 1536,  686, 516,  686, 518,  686, 516,  686, 518,  686, 516,  686, 518,  686, 522,  686, 1536,  686, 518,  686, 518,  686, 516,  686, 518,  686, 518,  686, 516,  686, 516,  686, 518,  686, 516,  686, 516,  686, 516,  686, 518,  686, 516,  686, 518,  686, 516,  686, 518,  686, 1538,  686, 516,  686, 1536,  686, 530,  688, 516,  686, 1536,  686, 516,  686, 19308,  686, 518,  686, 516,  686, 516,  686, 516,  686, 518,  686, 518,  686, 516,  686, 518,  686, 516,  686, 518,  686, 516,  686, 518,  686, 516,  686, 516,  686, 518,  686, 516,  686, 518,  686, 516,  686, 516,  686, 518,  686, 516,  686, 516,  686, 516,  686, 518,  686, 518,  686, 516,  686, 518,  686, 518,  686, 1536,  686, 1538,  686, 516,  686, 1536,  686, 39704,  9016, 4512,  686, 1538,  686, 516,  686, 518,  686, 1536,  686, 516,  686, 518,  686, 516,  686, 518,  686, 518,  686, 516,  686, 518,  686, 1536,  692, 516,  686, 518,  686, 518,  686, 516,  686, 516,  686, 516,  686, 518,  686, 516,  686, 516,  686, 518,  686, 516,  686, 518,  686, 516,  686, 518,  686, 516,  686, 518,  686, 1536,  686, 1536,  686, 1538,  686, 522,  686, 516,  686, 1538,  686, 518,  686, 19526,  686, 518,  686, 516,  686, 516,  686, 516,  686, 520,  686, 518,  686, 516,  686, 518,  686, 516,  686, 518,  686, 516,  686, 518,  686, 518,  686, 516,  686, 518,  686, 516,  686, 516,  686, 516,  686, 518,  686, 516,  686, 516,  686, 516,  686, 518,  686, 516,  686, 516,  686, 518,  686, 516,  686, 516,  686, 1538,  686, 1536,  686, 516,  686, 1538,  686};  // KELVINATOR
uint8_t state[16] = {0x09, 0x08, 0x00, 0x50, 0x00, 0x00, 0x00, 0xB0, 0x09, 0x08, 0x00, 0x70, 0x00, 0x00, 0x00, 0xB0};

接收结束。